Frame Scene Aesthetic 3D Mockup
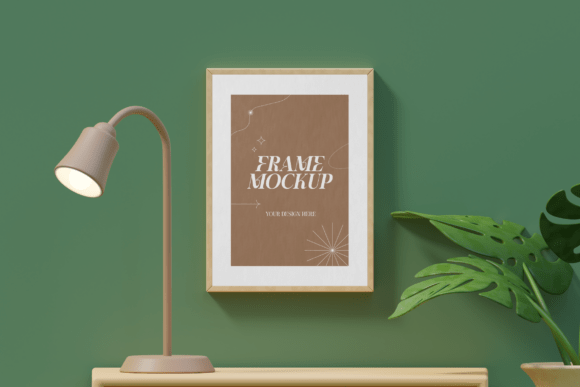
Presenting your creative work in a realistic setting is often the difference between a flat image and a compelling visual story. The Frame Scene Aesthetic 3D Mockup offers a warm, inviting environment that places your artwork front and center. This specific scene features a framed piece displayed against a soothing green wall, complemented by a decorative desk lamp and natural plant styling. It creates a cozy atmosphere ideal for showcasing art prints, posters, illustrations, and brand visuals within a stylish home or studio context.
While the final result looks polished and professional, many creators stumble when trying to replicate this level of quality without understanding the underlying mechanics. Whether you are an illustrator looking to sell digital downloads, an interior designer pitching a concept, or a small business owner launching a new product line, using the right mockup can save hours of design time. However, simply downloading a file and dropping in your image is not enough to guarantee success. There are several common pitfalls that can ruin the realism of your presentation if you do not approach the tool with the right expectations.
The Reality of Smart Object Layers
The core functionality of this Frame Scene Aesthetic 3D Mockup relies on smart object layers within Photoshop. The help guide included with the download explains that you should double-click the layer, place your design, and save. While this sounds straightforward, beginners often make the mistake of ignoring resolution constraints during this step. If you import a low-resolution graphic into a high-resolution frame, the final output will look pixelated, regardless of how beautiful the surrounding scene is.
To avoid this, always check the dimensions of your source file before placing it. The mockup itself is provided in a high resolution of 4000 x 3000 pixels at 300 dpi, which is excellent for both web display and print marketing materials. Your artwork must match or exceed these proportions relative to the frame area. If your illustration is too small, it will appear blurry; if it is too large, it may be cropped awkwardly or cause performance lag in your editing software. A better approach is to prepare your designs specifically for the intended frame size, ensuring they retain crisp edges and vibrant colors.
Lighting and Shadow Consistency
One of the most overlooked details in mockup usage is lighting consistency. The Frame Scene Aesthetic 3D Mockup includes a warm desk lamp and natural light filtering through the scene. When you insert your design, you might assume it will automatically blend into the environment. In reality, your image has its own lighting direction and intensity. If your artwork was created with bright, overhead lighting but placed in a shadowy corner of the mockup, the result will look fake and disjointed.
Professional users often adjust the opacity or blending modes of their inserted design to mimic the ambient light of the room. For instance, if the lamp casts a warm glow, you might add a slight yellow overlay to your artwork to match the tone. Similarly, shadows cast by the frame onto the wall or the desk need to align with the light source. Ignoring these subtle cues can make your presentation feel cheap, even if the mockup itself is high quality. Taking a moment to tweak the lighting settings ensures your art feels like a physical part of the room rather than a sticker pasted on top.
Choosing the Right Context for Your Brand
Not every design fits every scene. The green wall and plant styling create a specific mood—one that is organic, calm, and slightly rustic. This aesthetic is perfect for botanical prints, watercolor illustrations, or lifestyle brands focused on wellness and nature. However, if you are presenting a sleek, modern tech poster or a neon-lit urban streetwear design, this particular Frame Scene Aesthetic 3D Mockup might clash with your brand identity.
Making the wrong choice here can confuse your audience. A mismatch between the product vibe and the background can dilute your message. Before you start editing, ask yourself: Does this environment tell the story I want to tell? If you are targeting a minimalist audience, the decorative elements might feel too busy. Conversely, if you are aiming for a cozy, lived-in feel, the plants and lamp add exactly the right amount of texture. Evaluating the compatibility between your content and the scene prevents wasted effort on a project that won't resonate with your target demographic.
File Management and Stock Image Limitations
A critical detail found in the documentation is that all stock images inside the mockup are not included. This means the green wall texture, the specific plant species, and the lamp model are proprietary assets contained within the PSD file. You cannot extract these elements to use in other projects or share the raw scene files without permission. Some users mistakenly try to isolate these background elements, only to find that the layers are locked or flattened.
This limitation is standard for high-quality mockups but requires careful file management. Always keep the original PSD intact as a master file. When you need to present different variations, duplicate the main file rather than modifying the original. Additionally, ensure you have the necessary licenses to use the mockup for your intended purpose, whether that is commercial client work or personal portfolio pieces. Failing to respect these licensing terms can lead to legal issues down the line. The included help file serves as a valuable resource for clarifying these rights and technical limitations.
Evaluating Usability for Different Skill Levels
This tool is designed to be accessible to everyone from hobbyists to seasoned professionals. The inclusion of a PDF help guide makes it easier for beginners to navigate the interface without feeling overwhelmed. However, even experienced designers can miss efficiency tips. For example, knowing how to group layers properly can streamline your workflow when you need to export multiple versions of the same design quickly.
If you are working on tight deadlines, the ability to simply double-click, swap the image, and save is a massive time saver compared to building a 3D scene from scratch. But don't let the ease of use lull you into skipping the review process. Always zoom in to 100% to check for alignment issues or unintended artifacts. A small misalignment in the perspective of the frame can be distracting to a sharp-eyed viewer. By taking the extra minute to inspect your work, you ensure that the final output meets the high standards expected in today's competitive market.
Maximizing the Investment
When you invest in a single PSD file like the Frame Scene Aesthetic 3D Mockup, you are buying more than just an image; you are buying a versatile asset for your entire portfolio. With a 4000 x 3000 pixel resolution, you can use the same file for social media posts, website banners, print catalogs, and email newsletters. This versatility reduces the need to purchase multiple mockups for different platforms, saving both money and storage space.
To get the most out of this purchase, consider creating a library of variations. Save different color backgrounds or adjust the lighting effects to suit various campaigns. By treating the mockup as a flexible template rather than a static image, you unlock its full potential. Remember, the goal is to communicate your vision clearly and effectively. With the right preparation and attention to detail, this warm, inviting scene becomes a powerful tool to elevate your brand and showcase your creativity.